Dream Maker of The World of Mini Food: The Story Behind Mini Brands Food

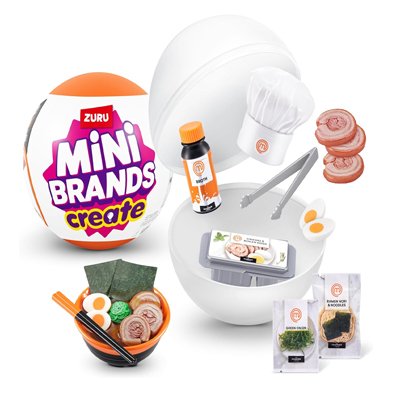
mini brands make itWhen you unpack the package with the words “surprise blind box” printed on it, and your fingertips touch the Oreo cookies smaller than a coin and the Lay’s potato chip bag as big as a palm, have you ever thought about how these mini foods that can be mistaken for real have turned from creativity into collectibles that make players around the world crazy? As the most popular branch of the Mini Brands family, Mini Brands Food is not just a “miniature snack”.

Obsession with “mini”: millimeter-level reproduction is the soul

Some people say “Isn’t it just to reduce the packaging?” – But for us, every Mini Brands Food is a “details competition”.
In order to make the mini Coca-Cola bottle look “exactly the same” as the real one, the design team will use a magnifying glass to study the curvature of the bottle: the font size on the label must be reduced to 1:12, and even the thread pattern of the bottle cap must be reproduced; when making the mini Heinz ketchup, even the “scale line that changes color after squeezing” on the bottle was not spared. Not to mention those with “inner” styles: the openable Oreo cookie box really has two mini sandwich cookies; the detachable nut energy bar packaging even has the printed texture of “nut particles” clearly visible.
Why are we so serious? Because we want you to remember the joy of tearing open the real packaging the moment you pick it up – the intimacy of “Wow, it’s exactly the same as the one in my refrigerator” is the magic of Mini Brands Food.
mini brands foods

From shelves to fingertips: the careful consideration of product selection

Not all snacks can become a member of Mini Brands Food. Before each new product is launched, our product selection team is like conducting a “food audition”:
First of all, it must be a “national-level familiar face” – Lay’s, Oreo, Kraft cheese… These brands that you have grown up with have the gene of “wanting to collect them when you see them”; secondly, there must be “visual memory points”: red Coke bottles, yellow and blue potato chip bags, spotted cow-patterned cheese boxes, bright colors and iconic patterns, which can still be recognized at a glance after being reduced; finally, it must be able to play with tricks: stackable biscuit boxes, mini juice bottles that can be hung on key chains, and shelf sets suitable for building “mini supermarkets”, so that you can not only “see”, but also create your own mini food world.
A mother told us that when her child played “supermarket house” with Mini Brands Food, he would carefully “price” each mini snack and even imitate the cashier scanning the code – it turns out that these small objects can also become props for children to understand the world.

More than just a toy: Mini brands want you to fall in love with the “goodness of food” again

You may not know that some players put Mini Brands Food in front of their desks, saying “When I see the mini version of the energy bar, I remember that I should eat something to replenish my energy”; others use mini chocolate bars to “satisfy my cravings” when losing weight, and say with a smile “It not only satisfies my eyes, but also does not break my work.”
This is exactly the little thought hidden in Zuzu’s design: food hides memories and emotions. We hope that Mini Brands Food can become a “portable carrier” of this emotion(why we love tiny things) – condensing your hesitation in front of the supermarket shelves, the joy of sharing snacks, and the joy of buying candy with pocket money in childhood in this palm-sized space.

The mini dining table of the future: there are more surprises in the oven

Are there any players urging for the “ice cream series” recently? Don’t worry. The ZUZU design team is working on how to make the cream top of the mini cone look like it just came out of the fridge.
Next, you might see hamburger sets that can be assembled. You might also see chocolates with packaging you can tear open.There may even be AR models that interact with real snack packaging. You can scan the code on the mini package to see how it looks when it gets “enlarged” in the real world.
After all, Mini Brands Food never wants to “shrink the world”, but to give you a small universe of food. Next time you open a blind box, remember to take a closer look at the care hidden in the details – because each mini food is a love letter to food lovers.

How to Clean Your Retainer: A Complete Guide

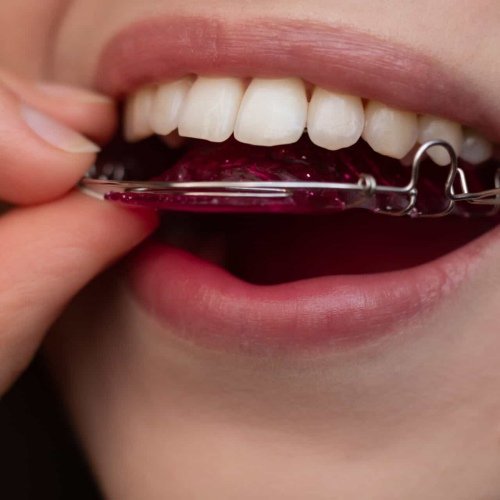
For many people, retainers are an essential part of maintaining their dental health and preserving that hard – earned straight smile. However, just like any other dental appliance, retainers require proper care and cleaning to ensure they stay hygienic, functional, and free from unpleasant odors and bacteria.
In this blog post, we’ll explore the importance of cleaning your retainer and provide you with a comprehensive guide on how to do it effectively. Whether you’re a new retainer wearer or have been using one for years, this information will help you keep your retainer in top – notch condition and your smile looking its best.

Why Clean Your Retainer?

Before we dive into the cleaning methods, let’s understand why it’s crucial to clean your retainer regularly. Retainers are exposed to food particles, bacteria, and plaque from your mouth throughout the day. Over time, these can accumulate on your retainer, leading to:
Unpleasant Odors
Bacteria feeding on food particles can produce foul – smelling gases, resulting in bad – smelling retainers and potentially bad breath.
Plaque and Tartar Buildup
Plaque is a sticky film of bacteria that can harden into tartar if not removed. This can not only affect the appearance of your retainer but also irritate your gums and impact your oral health.
Increased Risk of Infections
A dirty retainer can introduce harmful bacteria into your mouth, increasing the risk of gum disease, tooth decay, and other dental infections.
By keeping your retainer clean, you can avoid these issues and ensure that your retainer continues to protect your smile effectively.

Daily Cleaning Routine

A consistent daily cleaning routine is the foundation of good retainer care. Here’s a simple yet effective way to clean your retainer every day:

1. Brushing with Toothpaste

  • Use a Soft – Bristled Toothbrush: A soft – bristled toothbrush is gentle enough to clean your retainer without causing scratches that could damage the appliance.
  • Apply a Small Amount of Mild Toothpaste: Choose a toothpaste that doesn’t contain whitening agents or harsh abrasives, as these can be too harsh on the retainer material.
  • Gently Brush All Surfaces: Thoroughly brush the inside, outside, and edges of your retainer. Pay special attention to areas where food particles and plaque are more likely to accumulate, such as around the wires or edges.

2. Rinsing

After brushing, rinse your retainer thoroughly under lukewarm (not hot) water to remove any remaining toothpaste and loosened debris. Hot water can warp certain types of retainers, so it’s best to stick to lukewarm or cool water.

Deep Cleaning Methods

In addition to your daily cleaning routine, it’s important to give your retainer a more thorough cleaning on a regular basis. Here are some effective deep – cleaning methods:

1. Using Retainer Brite Cleaning Tablets

Retainer Brite cleaning tablets are specially formulated for cleaning retainers and other removable dental appliances. They provide a convenient and effective way to deep – clean your retainer. Here’s how to use them:
  • Fill a Glass with Warm Water: Make sure the water is warm but not hot, as hot water can damage some types of retainers.
  • Drop in One Retainer Brite Tablet: The tablet will dissolve and create an effervescing blue solution that helps to loosen and remove stubborn stains, plaque, and bacteria.
  • Place Your Retainer in the Solution: Let your retainer soak for 15 minutes. This allows the cleaning solution to penetrate and clean all areas of the retainer.
  • Rinse Thoroughly: After soaking, remove your retainer and rinse it well under running water to ensure all the cleaning solution is washed away.
Retainer Brite is suitable for a variety of retainers, including clear plastic Invisalign aligners, Hawley retainers, and Essix retainers. It’s important to note that Retainer Brite is not recommended for retainers with metal solder points or for dentures and artificial teeth.

2. Vinegar and Baking Soda Solution

For a natural alternative to commercial cleaning products, you can use a mixture of vinegar and baking soda:
  • Mix 2 Teaspoons of White Vinegar with 1 Cup of Lukewarm Water: The vinegar helps to dissolve stains and kill bacteria.
  • Add 1 Teaspoon of Baking Soda: Baking soda acts as a gentle abrasive to help scrub away stubborn stains.
  • Soak Your Retainer in the Solution for 15 – 20 Minutes: This allows the solution to work on cleaning and disinfecting your retainer.
  • Rinse and Brush: After soaking, remove your retainer and rinse it under water. You can also use a soft – bristled toothbrush to gently brush away any loosened debris.
While this natural method can be effective, it’s important to rinse your retainer thoroughly after using vinegar to avoid any residual vinegar taste or odor. Visit www.zimadentalpod.com to get best method to clean your retainer.

3. Ultrasonic Cleaners

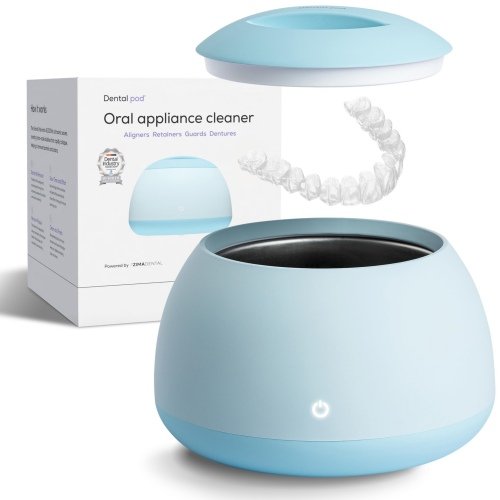
Ultrasonic cleaners are another option for deep – cleaning retainers. These devices use high – frequency sound waves to create bubbles in a cleaning solution, which then implode and dislodge dirt and debris from the retainer. Here’s how to use an ultrasonic cleaner:
  • Fill the Cleaner with the Appropriate Solution: Some ultrasonic cleaners come with their own cleaning solution, while others can be used with products like Retainer Brite tablets dissolved in water.
  • Place Your Retainer in the Cleaner: Make sure the retainer is fully submerged in the solution.
  • Run a Cleaning Cycle: Follow the manufacturer’s instructions for the cleaning cycle time, which is typically around 5 – 10 minutes.
  • Rinse and Dry: After the cycle is complete, remove your retainer and rinse it under water. Pat it dry with a clean, lint – free cloth.
Ultrasonic cleaners can be particularly useful for reaching into the tiny crevices of retainers where bacteria and debris can hide. However, it’s important to follow the manufacturer’s guidelines for using the cleaner with your specific type of retainer.

How Often Should You Clean Your Retainer?

To maintain optimal oral health and keep your retainer in good condition, it’s recommended to:
  • Clean Your Retainer Daily: Perform the basic cleaning routine of brushing with toothpaste and rinsing at least once a day.
  • Deep – Clean Weekly: Use one of the deep – cleaning methods mentioned above, such as Retainer Brite tablets, a vinegar and baking soda solution, or an ultrasonic cleaner, at least once a week.

Additional Tips for Retainer Care

Here are some extra tips to help you keep your retainer clean and in good shape:
  • Always Rinse Your Retainer After Eating: If you remove your retainer to eat, rinse it off under water afterward to remove any food particles.
  • Store Your Retainer Properly: When you’re not wearing your retainer, keep it in a clean, protective case to prevent it from getting lost, damaged, or contaminated.
  • Avoid Using Hot Water: As mentioned earlier, hot water can warp some types of retainers, so stick to lukewarm or cool water for cleaning and soaking.
  • Replace Your Retainer if Necessary: Over time, retainers can wear out or become damaged. If you notice any issues with the fit or function of your retainer, consult with your orthodontist about getting it replaced.

Conclusion

Taking proper care of your retainer is essential for maintaining your oral health and ensuring that your retainer continues to work effectively. By following a consistent daily cleaning routine and incorporating periodic deep – cleaning methods, you can keep your retainer clean, fresh, and free from harmful bacteria and unpleasant odors.
Whether you choose to use Retainer Brite cleaning tablets, a natural vinegar and baking soda solution, or an ultrasonic cleaner, the key is to make retainer cleaning a regular part of your dental care routine. Your smile will thank you for it!
Remember, a clean retainer is a healthy retainer, and a healthy retainer means a beautiful, straight smile that lasts. So take the time to care for your retainer, and it will continue to support your dental health for years to come.

UJI Matcha: The “Green Gold” from Kyoto’s Secret Garden & Marukyu Koyamaen’s Magical Touch

In the world of matcha, UJI  isn’t just a name—it’s a badge of honor. Picture this: misty tea fields hugged by Kyoto’s mountains, where every sip feels like a sip of history. Today, we’re diving into why UJI matcha is the OG of green tea, and why brands like Marukyu Koyamaen uji matcha powder are turning it into a global sensation.

UJI: Where Nature & Tradition Craft the Perfect Matcha

Climate & Soil: Mother Nature’s Recipe

Nestled in Kyoto’s southern basin, UJI’s climate is like a chef’s dream kitchen. Cool temperatures, rainy seasons, and volcanic soil rich in minerals create the ultimate tea-growing conditions. The result? Matcha with 30% more amino acids (hello, umami!) and way less bitterness than your average green tea.

Shade-Grown Magic: The Art of Covering

UJI’s secret weapon? “Oishita” cultivation—tea plants covered with bamboo screens or black nets 20-40 days before harvest. This cuts sunlight by 90%, forcing the leaves to pump out chlorophyll and L-theanine (the stuff that makes matcha creamy and sweet). Take Marukyu Koyamaen’s “Gokou” matcha: picked on day 28 post-shading, only the top two leaves and a bud are hand-harvested for the ultimate flavor balance.

Stone-Ground Perfection: Slow & Steady Wins the Race

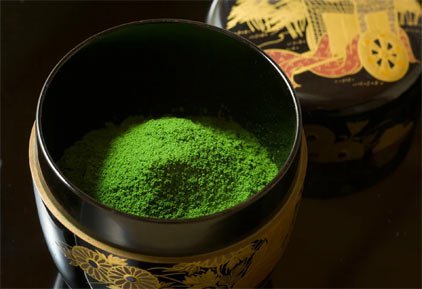
Top-tier UJI matcha is measured in “mesh” (think: super-fine powder). The gold standard? 1,000+ mesh (finer than a human hair!). Marukyu Koyamaen still uses ancient stone mills—30cm granite wheels grinding at 16 RPM to avoid heat damage. Their 10 master millers adjust the stones by hand, producing just 40g/hour. The result? Matcha that dissolves like silk, foams like whipped cream, and retains 90% of its antioxidants.

Marukyu Koyamaen: The Michelin Star of Matcha

19 National Championships: The GOAT of Green Tea

Since 1861, Marukyu Koyamaen has dominated Japan’s tea competitions (19 gold medals and counting!). Their “Gokou” matcha is the holy grail for tea ceremony masters. It’s all about balance: a hint of bitterness followed by a wave of sweetness, with a foam that lasts longer than your morning coffee. Perfect for lattes, baking, or just sipping straight.
marukyu koyamaen

From Farm to Cup: Obsessive-Compulsive Quality

Marukyu Koyamaen’s tea gardens are organic, pesticide-free, and trimmed to 30cm for maximum leaf juiciness. After steaming, drying, and de-veining, the leaves hit the stone mills. Packaged in vacuum-sealed foil, their matcha stays fresh for 3-4 weeks post-opening (no sad, clumpy powder here!).

Everyday Luxury: Matcha for the Masses

Not into tea ceremonies? No prob. Marukyu Koyamaen’s “Aosa” and “Wakaba”  lines are budget-friendly yet still crazy good. “Aosa” (1,200 mesh) is perfect for ice cream and cakes, while “Wakaba”’s subtle bitterness makes it a coffee shop fave. Even Starbucks’ Matcha Frappuccino uses their powder (though we recommend trying it unsweetened first!).
Uji Matcha

Marukyu Koyamaen Uji Matcha Powder From Kyoto to Your Kitchen

UJI matcha is everywhere now—from Hollywood’s wellness scene to Blue Bottle Coffee’s NYC stores. Marukyu Koyamaen’s “Gokou” sells for $26.99/40g on Yamibuy and still flies off the shelves. Their Blue Bottle collab? A TikTok hit. Why? Because UJI matcha isn’t just tea—it’s terroir, tradition, and time in a cup. As the 10th-gen owner says, “Matcha isn’t a product. It’s a gift from the land.”

Final Sip

Next time you order a matcha latte, remember: that vibrant green hue comes from UJI’s farmers and artisans. From shade-growing tricks to stone-mill precision, Marukyu Koyamaen turns every sip into a celebration of Japanese craftsmanship. So close your eyes, take a sip, and let the umami and sweetness dance on your tongue—it’s nature and history, bottled in green.
P.S. Tag a matcha lover who needs to try Marukyu Koyamaen ASAP!

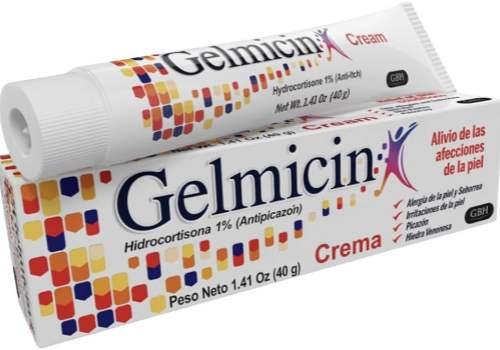
Gelmicin Cream: Safe and Effective Relief for Various Skin Itching Problems

When facing skin itching problems, choosing a safe and effective product is crucial. Gelmicin Cream, with its unique formula and well-designed ingredient ratio, offers patients a reliable treatment option. This article explores how Gelmicin Cream helps address various skin itching issues from aspects of safety and effectiveness.
gelmicin cream safe and effect

1. Safety Guarantee: Scientific Design of Ingredients and Usage Restrictions

The safety of Gelmicin Cream is reflected in its ingredient selection. Hydrocortisone, the active ingredient, is a relatively mild glucocorticoid. Compared to other potent hormones, it is less likely to cause side effects like skin thinning and atrophy when used properly. The inactive ingredients, such as aloe vera and petroleum jelly, are also widely verified safe components. Aloe vera has soothing and moisturizing effects, reducing skin dryness and discomfort, thereby enhancing the product’s safety. You can visit https://www.thegelmicin.com/ for Skin for more detailed information on Gelmicin Cream and its ingredients.
Moreover, the usage restrictions of Gelmicin Cream provide additional safety assurance. It is clearly marked for external use only, avoiding the risk of drug entry into the body through oral or other routes. Detailed guidance and precautions are provided for use on special areas like the genital and anal regions. These restrictions and guidelines help patients use the product correctly and reduce adverse reactions from misuse or overuse.

2. Effectiveness Verification: Supported by Clinical Research and Patient Feedback

Numerous clinical studies have shown that a concentration of 1% hydrocortisone can effectively alleviate skin itching in a short time. Gelmicin Cream has also gained widespread recognition in clinical applications. Patient feedback indicates that most users experience significant relief of itching within minutes to hours after use. This rapid effect is attributed to the potent anti-inflammatory and immunosuppressive effects of hydrocortisone.
For patients with chronic skin conditions like eczema and psoriasis, Gelmicin Cream can effectively control acute flare-ups, reduce itching and inflammation, and improve quality of life. In cases of acute itching due to contact dermatitis and insect bites, Gelmicin Cream can quickly take effect and help patients through the uncomfortable period.

3. Special Population Considerations: Applicability for Children and Pregnant Women

For pediatric patients, Gelmicin Cream has been proven safe and effective for children aged 2 and above. Its mild formula and appropriate hormone concentration meet the special needs of children’s skin. However, for children under 2 years old, consultation with a doctor is recommended before use due to their more delicate and sensitive skin.
Pregnant and breastfeeding women need to be extra cautious when using any medication. The product manual for Gelmicin Cream advises consulting a healthcare professional before use. Although topical hormones are generally less systemically absorbed, there is still some potential risk. Doctors will weigh the pros and cons based on the patient’s specific situation and provide personalized usage recommendations.
gelmicin ointment

4. Drug Interactions: Avoiding Potential Risks

When using Gelmicin Cream, it is important to be aware of possible drug interactions. If a patient is using other hormone-containing medications, such as oral hormones or topical steroid creams, they should inform their doctor to avoid hormone excess.
Additionally, certain medications may interact with ingredients in Gelmicin Cream, affecting drug effectiveness or increasing the risk of adverse reactions.
For example, some antibiotics or antifungal drugs may interact with hydrocortisone, altering its efficacy. Therefore, it is best to consult a doctor or pharmacist before using Gelmicin Cream alongside other medications.
In summary, with its scientifically designed ingredients, clear usage restrictions, clinical research support, and careful considerations for special populations, Gelmicin Cream excels in both safety and effectiveness. It provides a trustworthy treatment option for those suffering from skin itching, allowing them to treat their conditions with confidence and assurance.

QB54 Tailgate Games: Redefining Pre-Game Fun

In the world of tailgating, where food, friends, and football collide in a uniquely American tradition, one game is redefining the pre-game experience: QB54 Tailgate Games. This innovative, all-in-one football toss game and portable chair combo has quickly become a fan favorite—bringing together functionality, fun, and fierce competition in one compact setup.

What Is QB54?

QB54 is more than just a tailgate game—it’s a dual-purpose innovation. At first glance, it looks like a pair of rugged, collapsible camping chairs. But within seconds, these chairs transform into a football toss target system, complete with a scoring net, goalposts, and even a regulation-size mini football. It’s a game, it’s a seat, and it’s the ultimate conversation starter all in one.

Why QB54 Tailgate Games Are Taking Over Parking Lots

Tailgate parties are all about community, creativity, and competition—and QB54 checks every box:
qb54 tailgate games
  • All-Ages Appeal: Whether you’re tossing passes with your kids or going head-to-head with fellow fans, QB54 suits players of all skill levels.
  • Easy Setup: Forget the bulky cornhole boards. QB54 sets up in under a minute and folds down small enough to stash in your trunk.
  • Portable and Durable: Built from aircraft-grade aluminum and tear-resistant fabric, QB54 is designed to withstand years of outdoor use.
  • Dual Use: When you’re not playing, it’s your seat. Each unit functions as a comfortable, high-back camp chair with cup holders and storage pockets.

Tailgate Tested, Fan Approved

From college campuses to NFL parking lots, QB54  are rapidly becoming the must-have entertainment at any sporting event. Fans love the authentic football feel combined with the laid-back fun of a casual toss game. Whether it’s a Sunday showdown or a Saturday afternoon rivalry, QB54 adds that extra spark to the pre-game party.
Portable QB54

Game Rules at a Glance

  • Two chairs face each other about 40 feet apart.
  • Players take turns tossing a football at the target chair’s hole (3 points) or hitting the chair itself (1 point).
  • First team to 54 points wins—a nod to the jersey number often associated with linebackers, defense, and old-school grit.

Beyond Tailgates: Endless Use Cases

While it shines at tailgates, QB54 is also perfect for:
  • Backyard barbecues
  • Beach days
  • Camping trips
  • Youth football training
  • Corporate team-building events
Its unique design encourages movement, interaction, and spirited competition—without the need for a full field or complex setup.

Tailgating Just Got Upgraded

QB54 Tailgate Games represent the evolution of tailgating culture. It blends the joy of classic backyard sports with the convenience of modern outdoor gear. Whether you’re a die-hard football fan, a weekend warrior, or someone who just loves a good game, QB54 is the new MVP of your tailgate lineup.

Maintenance Tips for French Fry Frying Line Equipment

In the food processing industry, a French fry frying line is a key piece of equipment for producing high-quality fries. To ensure the long-term stable operation and efficiency of this equipment, regular maintenance and care are essential. Here are some important maintenance tips to help extend the lifespan of your equipment and maintain production efficiency.

1. Daily Cleaning

Surface Cleaning: After each production run, thoroughly clean the exterior of the machine and equipment to remove oil and residue. This prevents buildup that could affect performance.

Tank and Conveyor Cleaning: Regularly clean the frying oil tank to remove sediment and impurities, ensuring the oil remains clean. Also, clean the conveyor belt to remove oil and food residue.

Internal Cleaning: Periodically clean the interior of the fryer and its pipelines to remove hard particles and residue, preventing damage from accumulated debris.

2. Regular Inspections

Electrical System Check: Regularly inspect the electrical system to ensure that connections are secure and free from aging or damage. This helps prevent electrical faults.

Mechanical Component Check: Inspect the drive system, bearings, chains, and other mechanical parts for wear and tear. Replace any severely worn components promptly.

Temperature Control Check: Ensure that the oil temperature is maintained within the set range and regularly calibrate the temperature control system.

3. Lubrication and Maintenance

Regular Lubrication: Apply lubricant to the drive system, bearings, and other components that require it. This reduces friction and extends the life of these parts, save the cost of the machine.

Lubricant Selection: Choose lubricants that are appropriate for your equipment to ensure effective lubrication.

Bolt Tightening: After each weekly use, tighten the equipment bolts, especially those on the contactor terminals, chains, and screws.

4. Oil Management

Regular Oil Replacement: Based on production volume and oil condition, regularly replace the frying oil to ensure food quality and safety.

Oil Quality Testing: Use professional testing equipment to regularly check the oil’s acid value and color. This helps determine when the oil needs to be changed.

5. Equipment Shutdown Maintenance

Scheduled Downtime for Inspection: Periodically shut down the equipment for a comprehensive inspection. Check the condition of all components and repair any issues found.

Component Replacement: Replace key components such as heating tubes and temperature controllers if they show signs of wear or aging.

6. Safety and Operation Tips

Coarse Filtration and Residue Removal: Clean the coarse filter every half hour, and empty the residue tray as soon as it fills up to prevent residue from lingering inside the equipment.

Scraping Belt and Mesh Belt Maintenance: Continue running the scraping belt for 15-30 minutes after production ends, and lift the mesh belt support 30 minutes after cutting off the heating power.

Cleaning Agent Selection: Avoid using strong acids or alkalis to clean the equipment. Instead, use neutral cleaning agents.

By following these maintenance practices, you can effectively extend the lifespan of your French fry frying line while ensuring efficient and safe production. If you encounter complex issues, it is recommended to consult the equipment manufacturer for assistance.

The Difference Between Non-fried Potato Chips and Fried Potato Chips

Fried potato chips, as the name implies, are processed potato chips by frying. Non-fried potato chips are made by baking potatoes and then spraying them with cooking oil to dry them to keep them crispy. Consumer Reports once sent 5 brands of non-fried and fried potato chips for inspection. The results showed that the fat content of non-fried potato chips was slightly lower than that of fried potato chips, but the total energy difference was not large, and the salt content of non-fried potato chips was higher than that of fried potato chips.

The difference between non-fried potato chips and fried potato chips

1. Different processing methods

“Non-fried potato chips” are baked instead of fried. There are two processing methods for potato chips: fried and baked. The fried type naturally has a high fat content, but non-fried potato chips are made by baking instead of frying. However, this does not mean that the ingredients do not contain oil. On the contrary, a lot of oil must be added before baking to achieve a crispy and fragrant taste. Clink fries and potato chips machine to find more information.

2. Non-fried potato chips require more conditioning

Compared with fried potato chips, non-fried potato chips are slightly less fragrant and have a certain gap in overall flavor, so manufacturers may compensate for the lack of flavor by increasing the amount of salt and adding additional MSG (i.e., monosodium glutamate).Check out this page to find how to process the potato chips.

3. Non-fried foods have health risks caused by high temperatures

Try not to eat too many non-fried potato chips. The so-called non-fried food does not mean that there is no oil in it. Non-fried potato chips are baked foods, and during the baking process, the temperature is often very high, so acrylamide, a substance harmful to the human body, may be produced in the potato chips.

The oils used in non-fried foods are mostly refined vegetable oils, vegetable shortenings, partially hydrogenated palm oils or hydrogenated vegetable oils. The names are different, but they are essentially hydrogenated oils. It will generate trans fatty acids, and a large amount of intake will increase the risk of chronic diseases such as diabetes, coronary heart disease, and metabolic syndrome.

In fact, to form the unique crispness, fragrance, and crispness of potato chips, the contribution of oil is indispensable. For example, the carbohydrate content of potatoes is 165% and the fat content is only 0.2%. It is a low-fat food with a strong sense of satiety, so it is very suitable for eating when losing weight. If you don’t add oil to make potato chips, the taste will be much harder and not as fragrant.

How KFC’s Chicken Nuggets Are Produced

The Production Process of KFC Chicken Nuggets

When we taste KFC’s golden, crispy and delicious chicken nuggets, have you ever wondered how these mouth-watering delicacies are born? Now, let’s unveil the mystery of KFC chicken nuggets production.

The production of KFC chicken nuggets begins with strict selection of raw materials. KFC uses high-quality white-feathered chickens as the main raw material for chicken nuggets. White-feathered chickens are a broiler breed obtained through scientific and excellent breeding, with the characteristics of fast growth and high meat yield. During the breeding process, these chickens are strictly fed and managed to ensure that they grow in a healthy environment and have tender and juicy meat.

When the white-feathered chickens reach the optimal slaughter weight, they are sent to KFC’s processing plant. Here, the chicken will be strictly inspected and cleaned to ensure that there are no impurities and contaminants. Afterwards, the chicken will be cut into a shape and size suitable for making chicken nuggets.

Next, the chicken nuggets will enter the marinating stage. KFC marinates the chicken nuggets with a special marinade that contains a variety of spices and seasonings, which can give the chicken nuggets a unique flavor and taste. During the marinating process, the chicken nuggets will fully absorb the flavor of the marinade and become more delicious. More process, clink on www.chickennuggetproductionline.com

After the marinating is completed, the chicken nuggets will enter the coating stage. KFC uses a special coating to wrap the chicken nuggets, so that a thin layer of crispy skin is formed on the surface of the chicken nuggets. This crispy skin will become more crispy during the frying process, adding more taste layers to the chicken nuggets.

Finally, the chicken nuggets will enter the frying stage. KFC uses high-quality edible oil to fry the chicken nuggets to ensure that the chicken nuggets can be evenly heated to achieve the effect of crispy outside and tender inside. During the frying process, the chicken nuggets will emit an attractive aroma that makes people salivate.

After this series of fine processing and strict quality control, KFC chicken nuggets are finally born. They are not only golden and attractive in appearance, crispy and delicious in taste, but also rich in nutrition, and are deeply loved by consumers. In KFC restaurants, these delicious chicken nuggets are paired with a variety of sauces and side dishes to bring customers the ultimate gourmet experience.

In short, the production process of KFC chicken nuggets is full of technology and innovation, and every link reflects KFC’s persistent pursuit of quality and sincere care for consumers. Whether it is from the selection of raw materials to processing and production, or from the design of taste to quality control, KFC strives to do its best so that every customer can taste the most delicious and healthiest chicken nuggets.

7 Interesting Facts About Cowboy Hats You Probably Didn’t Know

Cowboy hats are more than just a fashion statement; they’re part of American history. Though it’s not the day of the Old West anymore, there’s still something special about donning a cowboy hat. Here are seven facts about cowboy hats that you probably didn’t know:

Fact 1. The First Cowboy Hats Were Made out of Beaver Pelts.

Yes, you read that right. The first cowboy hats were actually made out of beaver pelts! These early hats were strong and durable, but they were also quite expensive.

Fortunately, there was another material that could be used to make cowboy hats: felt. Felt is made from compressed wool fibers, and it was a lot cheaper than beaver pelts.

Felt quickly became the material of choice for cowboy hats, and it’s still used today. But do you know that felt is made from…sheep? So, the next time you’re wearing your cowboy hat, you can imagine that you’re wearing a sheep on your head!

Fact 2. Original Cowboy Hats Do Not Feature Chin Straps.

how do old cowboys keep their hats on head

If you’ve ever seen a picture of a cowboy from the Old West, you might have noticed that their hats don’t have chin straps.

That’s because cowboy hats were originally designed to be worn in windy conditions. The wide brim helped protect cowboys from the sun and the wind.

So how did cowboys keep their hats on in the wind? Well, they are a lot of tricks that they used.

Some cowboys would put a piece of string through the brim of their hats and tie it under their chin. And some of them even put a little bit of Vaseline on their forehead to help keep the hat in place!

But nowadays, cowboy hats are more likely worn in a rodeo arena than on the open plains. And when you’re riding a bucking bronco, you need a chin strap to keep your hat from blowing away!

Fact 3. There Are Various Creases Of Cowboy Hats.

The crease in the brim of a cowboy hat is called the “crown.” And there are various types of crowns, depending on the style of the cowboy hat.

The most common type of crown is the “open crown.” This is the type of crown that you typically see in movies and on TV.

But there’s also the “telescope crown,” which is taller and narrower. And then there’s the “center dent crown,” which has a dent in the center of the brim.

The cultural significance of the cowboy hat crease is that it tells you where the cowboy is from.

For example, cowboys from Texas typically wear hats with an open crown, while cowboys from Wyoming usually wear hats with a telescope crown.

Fact 4. It Takes About Two Weeks to Make a Cowboy Hat By Hand.

If you’ve ever wondered how long it takes to make a cowboy hat, the answer is about two weeks.

That’s because each cowboy hat is made by hand, from start to finish. First, the felt is shaped into a cone. Then, the brim is cut and sewn onto the cone.

And finally, the hat is decorated with a bandanna or a feather. All of these steps are done by hand, which is why it takes about two weeks to make a single cowboy hat.

But nowadays, some cowboy hat makers are using machines to help speed up the process.

For example, there are machines that can cut and sew the brim of a cowboy hat. And there are also machines that can shape the felt into a cone.

But even with these machines, making a cowboy hat still takes about a week.

Fact 5. A Cowboy Hat Can Cost from $50 to $1000.

A cowboy hat’s price depends on the materials’ quality and workmanship.

For example, a hand-made cowboy hat made from top-quality materials can cost upwards of $1000. But a machine-made cowboy hat made from lower-quality materials might only cost $50.

Of course, the price of a cowboy hat also depends on the brand. For example, a Stetson cowboy hat will usually cost more than normal cowboy hats.

And the most expensive cowboy hats are usually custom-made. These hats are made to fit the specific measurements of the person’s head.

So, if you want a truly unique cowboy hat, be prepared to pay a high price!

Fact 6. The Biggest Cowboy Hat Ever Made Was 12 Feet Wide and Weighed 85 Pounds!

In 2011, a cowboy hat maker in Texas created the biggest cowboy hat ever made.

The hat was 12 feet wide and weighed 85 pounds! The brim of the hat was 6 feet wide, and the height of the crown was 4 feet.

This cowboy hat was so big that it had to be carried on a flatbed truck!

Fact 7. The Guinness World Record for the Most People Wearing Cowboy Hats at the Same Time Is 39,013 People!

In 2012, the Guinness World Record for most people wearing cowboy hats at the same time was broken.

The record was previously held by the city of Lubbock, Texas, where 1086 people wore cowboy hats at the same time.

But in 2012,  Anaheim, California, USA, beat that record by getting 39,013 people to wear cowboy hats at the same time!

Conclusion:

Cowboy hats are more than just a fashion statement; they’re an important part of American history and culture.

You can check more info about cowboy hats on many interesting websites such as kyefashion.

So next time you see someone wearing a cowboy hat, take a moment to appreciate all that this fascinating piece of headwear represents!